Posts

How to show a banner at each startup in Windows

There is a hidden feature in Windows and not many users know anything about it. You can setup a banner with a message in it. Each time your Windows boots up the same banner will pop up. The message can be anything from a welcome message to some important information . You can use it in the way you want. Follow the simple steps given below to setup a banner for your Windows system : First of all, go to “start” –> “run”. Type “regedit” and hit Enter. A new window will open named “registry editor”. In the left panal of the “registry editor”, go to the key: HKEY_LOCAL_MACHINESOFTWAREMicrosoftWindowsCurrentVersionpolicies system Now right click on the right panel, choose “new”,Select “string value”. A new “string value” will be created. Right click on it and choose “rename”. Type “LegalNoticeCaption” . Right click on that “string value” and choose “modify”. On the “value data:” area, type the text or value that you want to see in the title bar of the banner. Now c...

Change STARTUP and SHUTDOWN sounds in XP

Have you ever felt bugged-up with the Start-up and Shutdown jingle of your Windows XP or Vista ? If yes, here is the solution, now you use any of your favorite voice or music or dialogue as your PC’s shutdown and start up. It’s a simple 4 step process. Step 1. Choose the track which you want to play at start-up and shutdown jingles, Limitations are * It should be in .WAV format. * The size of file should not be large, prefer keeping them within in 1 Mb, otherwise your startup will take a bit longer. If the file you want to make your start-up or shutdown is not in .WAV format, you can easily convert them using Jet Audio 7, or any other converter. Step 2. Now rename these files as “Windows XP Startup.WAV” and “Windows XP Shutdown.WAV” respectively. Step 3. Now Go to “C:WINDOWSMEDIA”, here you will find files “Windows XP Startup.WAV” and “Windows XP Shutdown.WAV”, move them to some other locations, this step is required for, in case you need to revert back these sounds, els...

Using the mouse wheel to change the icon views

Image
If you’re using Windows Explorer to work with your files and folders, you’ve probably already discovered the new Views menu. You just click the arrow next to the Views icon on the toolbar to bring up the Views menu, as shown in Figure , and then drag the slider up or down to change the size and appearance of the file and folder icons.                                                               Figure The slider on the Views menu has seven settings that range from Extra Large Icons to Tiles. While clicking the icon and dragging the slider is simple enough there is an easier way. Simply hold down the [Ctrl] key and scroll your mouse wheel up and down to resize the icons from Tiles to ...

Launching your favorite applications with the [Windows] key

Image
In the article, Customizing Vista's Taskbar and Start Menu, I showed you how to put the main area of the Start Menu to much better use by configuring it as a launching area for all the programs you use most often. However, Windows Vista provides you with an even better way to quickly access your favorite applications--you can assign them to special [Windows] key combinations. To take advantage of this hidden trick, all you have to do is add the shortcuts to your favorite applications to the Quick Launch toolbar, which you can do with a simple drag and drop operation. You can have up to 10 shortcuts on the Quick Launch toolbar to use with the [Windows] key. By default, the Show Desktop and the Switch Between Windows/Flip 3D shortcuts are already on the Quick Launch toolbar, so with the idea that you’d leave them there, you can add up to 8 additional shortcuts. Moving left to right, the first shortcut on the Quick Launch toolbar is automatically assigned to [Windows]+1, the seco...

Disable Dr. Watson

Dr. Watson can be disabled using the registry editor:   1. Start the registry editor (Start >> Run >> type "regedit.exe" >> Hit enter )   2. Navigate to HKEY_LOCAL_MACHINE \ SOFTWARE \ Microsoft \ Windows NT \ CurrentVersion\AeDebug   3. Click on AeDebug and click Del Alternativly just set HKEY_LOCAL_MACHINE \ SOFTWARE \ Microsoft \ Windows NT \ CurrentVersion \ AeDebug \ AUTO to 0 To re-enable Dr. Watson type "drwtsn32 -i" in run window.

How to Get Virtual Desktops on Windows XP?

Image
A lot of people prefer multitasking. The best tool for that purpose is virtual desktops. Virtual desktops provide the opportunity to run many desktops at the same time from a desktop computer or laptop. It is very easy to switch among the desktops by just using a button. Every virtual desktop can possess its unique applications as well as a different background. The feature of virtual desktops is not included in Windows XP by default. However, you can easily get virtual desktops on Windows XP. The means to get virtual desktops on Windows XP is very safe for the computer. All you have to do to get virtual desktops on Windows XP is to use software. This software provides four desktops to use.  In order to get virtual desktops on Windows XP, you have to use the Microsoft PowerToys download page. Follow these simple steps to get the virtual desktops:  Go to the “Microsoft PowerToys download page”.   Choose DeskMan.exe from the list on the right hand side of the window. ...

Orkut Album Hack Save Picture in orkut

Image
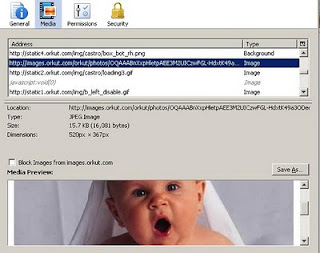
Orkut Album Hack Download Picture in orkut Many time we like to download pictures from our friends album but orkut has disable right click on their album so we cannot download their pictures from albums.Here is simple by which you can download pictures from your friends album.  Method 1 1. Open Orkut using Firefox 2.Then go to tools ,Next open page info 3.Click on the  media option 4.You can see a list of pictures found in that page and there will be a preview option in it using it select the picture, Click on save.You image will be save. For next picture, repeat from the first step Method 2 This is very simple open your friend album and picture that you want to save on your hard disk.Click on that image and drag it to you desktop.You image will be save their.