Posts

Showing posts from 2010

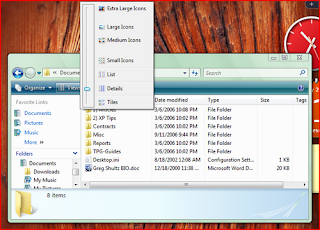
Launching sooon linux tutorials

Tool tricks has decided to launch Linux tutorial from the basc for those who want to learn Linux. At first we will be dealing with the basics of Linux so as a new member can also be familiar to this environment apart from windows. Each thing that u can do using windows can also be using Linux or UNIX.Linux is free to get and free to use, you an use modify according to your need and distribute (not all but most of them).Linux is open source and Linux is future

Disable The Send Error Report, to Microsoft

To disable the stupid feature in WinXP which tries to send a report to microsoft every time a program crashes you will have to do this: Open Control Panel Click on Performance and Maintenance Click on System. Then click on the Advanced tab Click on the error reporting button on the bottom of the windows. Select Disable error reporting. Click OK Click OK

How to repair a .rar file using Winrar

With Win Explorer create a sub folder REPAIRED Open WinRar, browse to the folder with the damaged Rar file(z). U can find which one is bad by selecting the 1st RAR file and using TEST button. Select the damaged file, press REPAIR button. In dialogue box, enter the path to the REPAIR subfolder, or browse to it. As long as there is a RECOVERY record in that Rar, it will be repaired. Copy all the NON-DAMAGED rars to your repair folder and rename the REPAIRED file back to it's original name. Proceed with extraction in the REPAIR folder as normal.

How to use the PASSWORD PROFILEcreated Earlier

To learn how to set password profile click here Note -> Everything U set on the default profile will occur everytime U rar files. So when U need the password profile, follow these instructions. The Default profile is used otherwise, such as when using WinRar from the contest menus in explorer. Open WinRar Browse to the filez/folderz U want to Rar with Password. Highlight all filez/folderz to be included. Press the ADD button. GENERAL tab | PROFILES button Scoll down to the profile whcih has the password set. In my example Superforum Click OK The filez are Rar'd. U can check if U did all correctly by opening the rar filez, and seeing if a password is required. Until U change back to DEFAULT profile in this same method, or close WinRar, all Rar'z U create after this will have a password.

How to create a password profile in Winrar

open WInRar Click the ADD Icon ADVANCED | Push the SET PASSWORD Button Check the SHOW PASSWORD box, so U can see what U typed and also copy/paste it to wherever U need it, such as on yer post. Now only one box will be open to enter the password. COPY/PASTE it to a txt file. I call mine WinRAR_Password.txt. Do this IMMEDIATELY afer entering it, before closing that window, or U may be very sorry later. Enter the password. It is CASE SENSITIVE. If the password is 8 or more alpha-numeric characters, no one will be able to hack it. Unless they own a super-computer. Avoid using words that are found in dictionaries. Check the encrypt file names box. That way, even if some nasty person obtains yer Rar file, they won't know what is in it, especially if the name U give the rar file is "Grandma_pix.rar" or whatever. Back to GENERAL tab | PROFILES button | Save Current Settings to a New Profile Enter the name of this profile. For example if the passwd is ht*p://www.tool-

Winrar setting options correctly

Open WInRar OPTIONS | SETTINGS | COMPRESSSION | CREATE DEFAULT GENERAL | (ok now that we're there, here's what U do next) But 1st -> realize that everything U set on the default profile will occur everytime U rar files. So if U only need a password occasionally, or other special settings, then create another profile for those purposes. U can change which profile U need to use when WinRar is open. The Default profile is used otherwise, such as when using WinRar from the context menus in explorer. General tab: Archive format RAR Compression method BEST size (enter in BYTES the size you want as the max single Rar file). I use 51,200,000 (50,000 KB x 1024). But chose yer max size as U wish. Update method ADD AND REPLACE FILES Archiving options: check > PUT RECOVERY RECORD Archiving options: check > TEST ARCHIVED FILES. Archiving options: check > DELETE FILES AFTER ARCHIVING ( unless U want yer HDD to fill up with the rars & the original

Disable XP Boot Logo

It is possible to disable the XP splash screen, which will slightly speed up the overall boot process. Be aware that removing the splash screen will also cause you not to see any boot-up messages that might come up (chkdsk, convert ... ), but if your system runs without any problems then it should not matter. • Edit boot.ini. • Add " /noguiboot" right after "/fastdetect". Upon restarting, the splash screen will be gone. It can be re-enabled by removing the new switch.

Very Slow Boot When Networking

On some XP Pro installations, when connected to a network (peer-peer in this case), the computer boot time is over 1:40. The system seems to freeze after logging in and the desktop may not appear or will freeze for a minute. As timed with the utility, Bootvis.exe, the problem was with the driver mrxsmb.dll, adding over 67 seconds to the boot time. Turning off and restoring file and printer sharing eliminated 65 seconds from the boot time. • Alt-click (or right-click) on Network Places > Properties. • Alt-click on Ethernet Adapter connection > Properties. • Un-check "File and Printer Sharing for Microsoft Networks" > OK. • Reboot. • If you need file or printer sharing, repeat the above, re-check the box and re-boot again.

Turn Off System Restore to Save Space

By default, Windows XP keeps a backup of system files in the System Volume Information folder. This can eat up valuable space on your hard drive. If you don't want Windows to back up your system files: • Open the Control Panel. • Double-click on System. • Click the System Restore tab. • Check "Turn off System Restore on all drives". • Hit Apply. • You may now delete the System Volume Information folder. Warning! If you turn this off you will not be able to use Windows System Restore to restore your system in case of failure.

Speed Up Detailed View in Explorer

If you like to view your files in Windows Explorer using the "Details" view here is a tweak to speed up the listing of file attributes: Viewing files in Windows Explorer using the "Details" mode shows various attributes associated with each file shown. Some of these must be retrieved from the individual files when you click on the directory for viewing. For a directory with numerous and relatively large files (such as a folder in which one stores media, eg: *.mp3's, *.avi's etc.), Windows Explorer lags as it reads through each one. Here's how to disable viewing of unwanted attributes and speed up file browsing: • Open Windows Explorer. • Navigate to the folder which you wish to optimize. • In "Details" mode right-click the bar at the top which displays the names of the attribute columns. • Uncheck any that are unwanted/unneeded. Explorer will apply your preferences immediately, and longs lists of unnecessary attributes will not be

Shutdown XP Faster

Like previous versions of windows, it takes long time to restart or shutdown windows XP when the "Exit Windows" sound is enabled. To solve this problem you must disable this useless sound • Click Start button. • Go to settings > Control Panel > Sound, Speech and Audio devices > Sounds and Audio Devices > Sounds. • Then under program events and windows menu click on "Exit Windows" sub-menu and highlight it. Now from sounds you can select, choose "none" and then click Apply and OK. Now you should see some improvements when shutting down your system

Stop Jerky Graphics

If you are connected to a LAN and have problems with jerky graphics, this might be the solution: • Right-click "My Computer". • Select "Manage". • Click on "Device Manager". • Double-click on your NIC under "Network Adapters". • In the new window, select the "Advanced" tab. • Select "Connection Type" and manually set the value of your NIC. (Not "Auto Sense" which is default.). • You should reboot.

Trick to Complete Formatting Mobile Phone

Here is the trick for complete formatting of your virus infected or other problem arriving mobile phone... This trick is for almost all Nokia models. 1. Switch off your phone... 2. Remove SIM card & memory chip... 3. Now press & hold keys - 3,*,call green) ... 4. Then without leaving these three buttons press power button... 5. Formatting task will be started... 6. Remember its a very rare trick.... Yes its true its call hard format. key * , 3 , Call button (green) press and hold when display is on than formatting screen is displayed. Wait for formatting to be finished, Before carrying out this process make sure you have copied all your contacts and notes onto your Memory, because every thing will be deleted. When its finished the formatted phone may be like new, just like when u have brought it from showroom.

How to check china mobile IMEI number valid and original?

Mobile number without or wrong IMEI number are banned accorss India now. Mostly China mobile phone brands like Alkatel, Sigmatel, GFIVE and many more now provide valid IMEI number Check China or any Mobile Phone IMEI Number Validity 1.Press *#06# on your mobile handset and note down the 15 digit IMEI number 2.Compose a new message from your mobile >> Type your 15 digit IMEI number >> Send it to 53232 3.If you get “Success” as the reply, then your mobile IMEI number is valid 4.If you get “Invalid IMEI” as the reply, that means your IMEI number is not valid 5.You are now done. This will help you to know that your imei number is valid or not

How to write blank scrap in orkut

If you like this simple trick, please do refer your friends. For writing blank scrap, follow the steps: 1) Open any scrapbook. 2) Write [i] in the scrapbook. 3) Do NOT write anything else in the scrapbook, and submit th scrap. That's all. NOTE: You can also use [b] tag instead of [i] tag You can also use this method to post a blank entry in any community forum. & Or Just Type The following in any Scrap &#8238

Adding Special Symbols in Scraps !!!!!!!!!!!!!!!

This is a much awaited trick on Orkut very less users know about it be d one n Impress your friends !! here it is Press alt key and d following 4rm num pad ... alt + 987 - █ alt + 1 - ☺ alt + 2 - ☻ alt + 3 - ♥ alt + 4 - ♦ alt + 5 - ♣ alt + 6 - ♠ alt + 7 - • alt + 8 - ◘ alt + 9 - ○ alt + 0178 - ² alt + 0489 - é alt + 0756 - ô alt + 0742 - æ alt + 0719 - Ï alt + 0739 - ã alt + 0729 - Ù The same way many combinations can be tried.. Note: most of this Symbols ever work on Facebook and other Social Networking sites similar to Orkut.

ORKUT CUTE (Scrap All Your Friends At Once)

Orkut cute a software by which you can browse orkut. This is an awesome software with which you can do many tricks like: 1. Send a same scrap to all your friends (Best thing is along with hyperlink!!! Yes, This software can bypass the word check!!!) 2. Start a same topic in all your communities. 3.Get Notifications Like "New Profile View", "New Scrap"

Windows Vista Hardware and Software Requirements

According to Microsoft corp, computers capable of running Windows Vista are classified as Vista Capable and Vista Premium Ready. A Vista Capable or equivalent PC needs to have at minimum an 800 MHz processor, 512 MB RAM and a DirectX 9 class graphics card. A computer that meets these requirements will be capable of running all editions of Windows Vista although some of the special features and high end graphics options may require additional or more advanced hardware. A Vista Premium Ready PC will take advantage of Vista's "high-end" features but will need at least a 1.0 GHz processor, 1 GB main memory, and an Aero-compatible graphics card with at least 128 MB graphics memory and supporting the new Windows Display Driver Model. The company also offers Windows Vista Upgrade Advisor from its website to determine the ability of a PC to run Vista in its various guises. The utility runs on Windows XP (with Service Pack 2) and Windows Vista. Microsoft lists some Vista capab

How to disable Windows XP Boot logo

It is possible to disable the XP splash screen, which will slightly speed up the overall boot process. Be aware that removing the splash screen will also cause you not to see any boot-up messages that might come up (chkdsk, convert … ), but if your system runs without any problems then it should not matter Edit boot.ini. Add ” /noguiboot” right after “/fastdetect”. Upon restarting, the splash screen will be gone. It can be re-enabled by removing the new switch.

Units of computer memory measurement

1 bit = binary digit 8 bit = 1 byte 1024 bytes= 1 KB(kilobyte) 1024 KB= 1 MB(Megabyte) 1024 MB= 1 GB(Gigabyte) 1024 GB= 1 TB(Terra byte) 1024 TB= 1 PB(Peta byte) 1024 PB= 1 EB(Exa byte) 1024 EB= 1 ZB(Zetta byte) 1024 ZB= 1 YB(yotta byte) 1024 YB= 1 Bronto byte 1024 Brontobyte= 1 Geop byte Geop Byte is the highest Memory Measurement Unit

notepad work like a personal diary

Tricks that can make notepad work like a personal diary for you There is a simple tricks that can make notepad work like a personal diary for you. The steps will make notepad as your personal diary: * Open a blank Notepad file. * Write .LOG and press enter, and save it (Whatever name you like). * Open the file you will see the Current time and Date and the cursor is on the next line. * Type your note there and save it. * Every time you open the file will give a new time (if you saved it previously) And enjoy the easiest diary writing ever.....

Improve Windows-XP Shutdown Speed

This tweak reduces the time Windows-XP waits before automatically closing any running programs when you give it the command to shutdown. Follow the steps as given below- 1) Go to Start then select Run 2) Type 'Regedit' and click ok 3) Find 'HKEY_CURRENT_USER\Control Panel\Desktop\' 4) Select 'WaitToKillAppTimeout' 5) Right click and select 'Modify' 6) Change the value to '1000' 7) Click 'OK' 8) Now select 'HungAppTimeout' 9) Right click and select 'Modify' 10) Change the value to '1000' 11) Click 'OK'

How to show a banner at each startup in Windows

There is a hidden feature in Windows and not many users know anything about it. You can setup a banner with a message in it. Each time your Windows boots up the same banner will pop up. The message can be anything from a welcome message to some important information. You can use it in the way you want. Follow the simple steps given below to setup a banner for your Windows system : * First of all, go to “start” –> “run”. * Type “regedit” and hit Enter. * A new window will open named “registry editor”. In the left panal of the “registry editor”, go to the key: HKEY_LOCAL_MACHINESOFTWAREMicrosoftWindowsCurrentVersionpolicies system * Now right click on the right panel, choose “new”,Select “string value”. A new “string value” will be created. * Right click on it and choose “rename”. Type “LegalNoticeCaption” . * Right click on that “string value” and choose “modify”. On the “value data:” area, type the text or value that you want to see in the title bar o

How can i get my unsaved word document

I Forgot to Save Word Document, How to Get it Back ? By default it saves a "backup" of the file every 10 minutes. Unless you’ve modified this option, you should be able to recover the most recent version of the backup file. But this option works only for Word 2003 and above. How to Recover Content from Unsaved Word Document ? From Searching Temp Folders You Can easily find unsaved word file from a temporary folder on your C: Drive. In fact you can find many recently edited files here. C:\Documents and Settings\uniquetricks\Application Data\Microsoft\Word C:\Documents and Settings\uniquetricks\Local Settings\Temp These are Hidden Files. Look for the most recent files here and probably you will find it. Auto Recovery Feature in Word 2007 This is an amazing feature in word 2007. When you open Microsoft word once again after any sudden power loss orsystem crash. Word 2007 will try to recover the lost data automatically !  In fact this is the best way and the only

One-Click Shutdown and Reboot Shortcuts

First, create a shortcut on your desktop by right-clicking on the desktop, choosing New, and then choosing Shortcut. The Create Shortcut Wizard appears. In the box asking for the location of the shortcut, type shutdown. After you create the shortcut, double-clicking on it will shut down your PC. But you can do much more with a shutdown shortcut than merely shut down your PC. You can add any combination of several switches to do extra duty, like this: shutdown -r -t 01 -c "Rebooting your PC" Double-clicking on that shortcut will reboot your PC after a one-second delay and display the message "Rebooting your PC." The shutdown command includes a variety of switches you can use to customize it. Table 1-3 lists all of them and describes their use. I use this technique to create two shutdown shortcuts on my desktop—one for turning off my PC, and one for rebooting. Here are the ones I use: shutdown -s -t 03 -c "Bye Bye m8!" shutdown -r -t 03 -

What is NET SEND Command

NET SEND Net Send command is used to send messages to other users, computers, or messaging names on the network. The Messenger service must be running to receive messages; it is automatically enabled when you install windows. You can send a message only to a name that is active on the network. Messenger Services can be used to send advertisements and spam to vulnerable machines on a network. A box will pop up on your screen with the text “Messenger Services” at the top, but the text will be an ad for a product or service interrupting whatever you’re doing on the computer at the time. To make sure this doesn’t happen to you, just take the following steps: Windows 2000 1. Click Start -> Programs -> Administrative Tools -> Services 2. Scroll down and highlight “Messenger” 3. Right-click the highlighted line and choose Properties. 4. Click the STOP button. 5. Select Disable or Manual in the Startup Type scroll bar 6. Click OK Windows XP 1. Click Start -> Cont

samsung secret codes

Samsung sph-n240, n400, a460, a500, etc Nam Programming: Nam Set: ##Spc Test Mode: 47*869#1235 Debug Menu: ##33284,ok Service Menu: Menu+8+0 (#889) Reset (Life time, Clear Memory, etc): ##786,ok A-key: ##2539,ok Label Selection: ##3882,ok Label(Home, Work, etc) : **523,ok NGG Setting (Gateway, etc.): ##2769737,ok Vocoder: ##8626337,ok CAI Change: ##7738,ok Enable TTY: ##889,ok Samsung sch-411, 611, n105, a100, a300, a2000, etc Nam Programming: Nam Set: 47*869#08#9 Nam Set: Menu+60 Test Mode: *759#813580 Test Mode: 5809540*45680 A-key: Menu+0, 25## External Audio: Menu+0, #### Debug Menu: Menu+8, 0415 or Spc Debug Menu: Menu+9, 0415 or Spc Brief NAM Programing: Menu+40,626 (not all version) LCD Contrast: Menu+45 (not all version) SIO Mode: Menu+49 SIO Mode: Menu+69 Samsung a300, a530, a610, a620, a660, a670, etc Nam Programming: Nam Set: Menu, 6, * Service Menu: Menu, 9, * Test Mode: 47*68#13580 Samsung X, E, V, S-series (kore

How to show a banner at each startup in Windows

There is a hidden feature in Windows and not many users know anything about it. You can setup a banner with a message in it. Each time your Windows boots up the same banner will pop up. The message can be anything from a welcome message to some important information . You can use it in the way you want. Follow the simple steps given below to setup a banner for your Windows system : First of all, go to “start” –> “run”. Type “regedit” and hit Enter. A new window will open named “registry editor”. In the left panal of the “registry editor”, go to the key: HKEY_LOCAL_MACHINESOFTWAREMicrosoftWindowsCurrentVersionpolicies system Now right click on the right panel, choose “new”,Select “string value”. A new “string value” will be created. Right click on it and choose “rename”. Type “LegalNoticeCaption” . Right click on that “string value” and choose “modify”. On the “value data:” area, type the text or value that you want to see in the title bar of the banner. Now c

Change STARTUP and SHUTDOWN sounds in XP

Have you ever felt bugged-up with the Start-up and Shutdown jingle of your Windows XP or Vista ? If yes, here is the solution, now you use any of your favorite voice or music or dialogue as your PC’s shutdown and start up. It’s a simple 4 step process. Step 1. Choose the track which you want to play at start-up and shutdown jingles, Limitations are * It should be in .WAV format. * The size of file should not be large, prefer keeping them within in 1 Mb, otherwise your startup will take a bit longer. If the file you want to make your start-up or shutdown is not in .WAV format, you can easily convert them using Jet Audio 7, or any other converter. Step 2. Now rename these files as “Windows XP Startup.WAV” and “Windows XP Shutdown.WAV” respectively. Step 3. Now Go to “C:WINDOWSMEDIA”, here you will find files “Windows XP Startup.WAV” and “Windows XP Shutdown.WAV”, move them to some other locations, this step is required for, in case you need to revert back these sounds, els

Using the mouse wheel to change the icon views

Image
If you’re using Windows Explorer to work with your files and folders, you’ve probably already discovered the new Views menu. You just click the arrow next to the Views icon on the toolbar to bring up the Views menu, as shown in Figure , and then drag the slider up or down to change the size and appearance of the file and folder icons.                                                               Figure The slider on the Views menu has seven settings that range from Extra Large Icons to Tiles. While clicking the icon and dragging the slider is simple enough there is an easier way. Simply hold down the [Ctrl] key and scroll your mouse wheel up and down to resize the icons from Tiles to Extra Large Icons. Using the [Ctrl] key and the mouse wheel combination also works on the Desktop. While the Desktop is selected, just hold down the [Ctrl] key and scroll your mouse wheel up and down to resize the icons from a microscopic 16 x 16 all the way up to huge 256 x 256 renditions.

Launching your favorite applications with the [Windows] key

Image
In the article, Customizing Vista's Taskbar and Start Menu, I showed you how to put the main area of the Start Menu to much better use by configuring it as a launching area for all the programs you use most often. However, Windows Vista provides you with an even better way to quickly access your favorite applications--you can assign them to special [Windows] key combinations. To take advantage of this hidden trick, all you have to do is add the shortcuts to your favorite applications to the Quick Launch toolbar, which you can do with a simple drag and drop operation. You can have up to 10 shortcuts on the Quick Launch toolbar to use with the [Windows] key. By default, the Show Desktop and the Switch Between Windows/Flip 3D shortcuts are already on the Quick Launch toolbar, so with the idea that you’d leave them there, you can add up to 8 additional shortcuts. Moving left to right, the first shortcut on the Quick Launch toolbar is automatically assigned to [Windows]+1, the seco

Disable Dr. Watson

Dr. Watson can be disabled using the registry editor:   1. Start the registry editor (Start >> Run >> type "regedit.exe" >> Hit enter )   2. Navigate to HKEY_LOCAL_MACHINE \ SOFTWARE \ Microsoft \ Windows NT \ CurrentVersion\AeDebug   3. Click on AeDebug and click Del Alternativly just set HKEY_LOCAL_MACHINE \ SOFTWARE \ Microsoft \ Windows NT \ CurrentVersion \ AeDebug \ AUTO to 0 To re-enable Dr. Watson type "drwtsn32 -i" in run window.

How to Get Virtual Desktops on Windows XP?

Image
A lot of people prefer multitasking. The best tool for that purpose is virtual desktops. Virtual desktops provide the opportunity to run many desktops at the same time from a desktop computer or laptop. It is very easy to switch among the desktops by just using a button. Every virtual desktop can possess its unique applications as well as a different background. The feature of virtual desktops is not included in Windows XP by default. However, you can easily get virtual desktops on Windows XP. The means to get virtual desktops on Windows XP is very safe for the computer. All you have to do to get virtual desktops on Windows XP is to use software. This software provides four desktops to use.  In order to get virtual desktops on Windows XP, you have to use the Microsoft PowerToys download page. Follow these simple steps to get the virtual desktops:  Go to the “Microsoft PowerToys download page”.   Choose DeskMan.exe from the list on the right hand side of the window.   It will all

Orkut Album Hack Save Picture in orkut

Image
Orkut Album Hack Download Picture in orkut Many time we like to download pictures from our friends album but orkut has disable right click on their album so we cannot download their pictures from albums.Here is simple by which you can download pictures from your friends album.  Method 1 1. Open Orkut using Firefox 2.Then go to tools ,Next open page info 3.Click on the  media option 4.You can see a list of pictures found in that page and there will be a preview option in it using it select the picture, Click on save.You image will be save. For next picture, repeat from the first step Method 2 This is very simple open your friend album and picture that you want to save on your hard disk.Click on that image and drag it to you desktop.You image will be save their.

Web Design Tips

While designing web sites it is important to keep in the mind the platform, popularly used web browsers and of course the users. One more important element of website design is search engines compatibility, since eventually the search engines will index the site to present it to the users in a search. How much the search engines give importance to your website depends a lot on the how the website is designed. These tips will help web designers to justify what is stated above. 1) Use colors carefully such that they are brand appropriate or do justice to whatever the site is providing.   This applies to the text, text fonts, background and the content provided. 2) Use tag lines, which highlight the essential features of the site and catch the attention of the readers, since visitors do not read the text fully. Set your content in proper paragraphs and columns for increased readability and appearance. 3) Avoid Flash and client side scripts on main pages. Do not use FRAMES since sea

How To Change Thumbnail Size And Quality

If any of you out there like to use the thumbnail view, especially for browsing through photos and images, it can become a bit of a drain on your system. It is possible to lower the thumbnail size and quality by editing the following registry keys. Open the registry and navigate to : HKEY_CURRENT_USER\ Software\ Microsoft \ Windows\ CurrentVersion\ Explorer Create a new DWORD value called ThumbnailSize, and set the value between 32 and 256. And/or create another DWORD value called ThumbnailQuality, and set the value between 50 and 100. Key Details : USER Key: [HKEY_CURRENT_USER\ Software\ Microsoft \ Windows\ CurrentVersion\ Explorer] Value Name: ThumbnailSize Data Type: REG_DWORD (DWORD Value) Data Value: 32 - 256 USER Key: [HKEY_CURRENT_USER\ Software\ Microsoft \ Windows\ CurrentVersion\ Explorer] Value Name: ThumbnailQuality Data Type: REG_DWORD (DWORD Value) Data Value: 50 - 100

Make Windows XP Shutdown Faster than ever

You can make your shut down process a bit faster by the following tweak.    1. This step is very important. Export (right click > Export) the following keys and save it to a safer place. HKEY CURRENT USER\Control Panel\Desktop HKEY_LOCAL_MACHINE\SYSTEM\CurrentControlSet\Control     2. Open Notepad, copy and paste the following to the Notepad. Windows Registry Editor Version 5.00 [HKEY_CURRENT_USER\Control Panel\Desktop] "AutoEndTasks"="1" "HungAppTimeout"="1000" "WaitToKillAppTimeout"="2000" [HKEY_LOCAL_MACHINE\SYSTEM\CurrentControlSet\Control] "WaitToKillServiceTimeout"="2000"     3. Save the file and close Notepad.     4. Change extension of the file from .txt (text file) to .reg (registry file).     5. Double click open this file and click Yes and the OK . Or download the following executable file from here alternate address here

Speedup Your Folder Browsing.

You may have noticed that everytime you open my computer to browse folders that there is a slight delay. This is because Windows XP automatically searches for network files and printers everytime you open Windows Explorer. To fix this and to increase browsing significantly: 1. Open My Computer 2. Click on Tools menu 3. Click on Folder Options 4. Click on the View tab. 5. Uncheck the Automatically search for network folders and printers check box 6. Click Apply 7. Click Ok 8. Reboot your computer

GPRS Interfaces

Different interfaces are used for routing between network nodes in GPRS. *Um interface provides communication between MS and BSS. *Gb interface provides connection between BSS and SGSN. *Gn interface provides connection between SGSN and GGSN within the same GPRS network. *Gp interface provides connection between SGSN and GGSN when they are in different GPRS network. *Gi interface provides connection between GGSN and external networks. *Gs interface provides communication between MSC and SGSN. GPRS functional Groups The functions which are defined in GPRS are following. *Network access function: Point to point data transfer, registration of MS with packet data protocols, radio resources for MS communication and charging information about packet transmission, is provided by this function. *Packet routing and transfer function: Routing of data between an MS and destination, conversion of GPRS address to external address and forwarding of packets between an MS and GGSN,

General Packet Radio Service (GPRS)

GPRS protocol is a packet-switch protocol; define for web applications in GSM network. In other words Internet on GSM network is standardized as GPRS network. GPRS has digital structure and this structure based on Time Division Multiple Access (TDMA) technique. One TDMA frame has 8 time slots (TSs). These TSs can be allocated to users, and single TS can be shared by several active users for uplink and downlink purposes. Different coding schemes are used to enhance data rate from 9Kbps to 150 Kbps per user, and it takes 0.5 to 1 second. Security features in GPRS is provided by GSM network. GPRS Architecture Global System for Mobile Communication (GSM) circuit-switch architecture does not support the GPRS packet-switch architecture. Thus, GPRS requires its own network architecture. Several networks and databases e.g. Mobile Station (MS), Base Station Subsystem (BSS), Home Location Register (HLR), Visitor Location Register (VLR) in existing GSM network are modified in GPRS network.

:: NOKIA ::.Universal Codes

These Nokia codes will work on most Nokia Mobile Phones (1) *3370# Activate Enhanced Full Rate Codec (EFR) - Your phone uses the best sound quality but talk time is reduced by approx. 5% (2) #3370# Deactivate Enhanced Full Rate Codec (EFR) OR *3370# ( Favourite ) (3) *#4720# Activate Half Rate Codec - Your phone uses a lower quality sound but you should gain approx 30% more Talk Time. (4) *#4720# Deactivate Half Rate Codec. 5) *#0000# Displays your phones software version, 1st Line : Software Version, 2nd Line : Software Release Date, 3rd Line : Compression Type. ( Favourite ) (6) *#9999# Phones software version if *#0000# does not work. (7) *#06# For checking the International Mobile Equipment Identity (IMEI Number). ( Favourite ) (8) #pw+1234567890+1# Provider Lock Status. (use the "*" button to obtain the "p,w" and "+" symbols). (9) #pw+1234567890+2# Network Lock Status. (use the "*" button to obtain the "p,w" and "+&qu

Installing a Wireless Router

First, turn off the PC and modem, then remove the Ethernet cable from the PC and plug it into the router's WAN port. Install a second Ethernet cable between the PC's Ethernet port and one of the router's Ethernet ports. Power the modem, router and then PC, waiting for the system to boot and initialize before attempting an Internet connection. Most routers are programmed with the manufacturer's default settings, including the network's name or service set identifier (SSID), channel and sign-on password. These default settings generally may be changed using included software or an online setup utility provided by the router's manufacturer. Configure the router by entering the router configuration IP address at the URL provided, followed by the configuration utility ID and the default password. To find your router's default IP address and the default login info, refer to the owner's manual. If you own a Linksys router, a popular brand, the IP address is u

Installing and configuring a Wireless Router

A wireless router affords laptop or portable computer users greater mobility in their homes and businesses. In most home networks, wireless routers are connected to a cable or DSL modem, and the router sends the signals and information that make up an Internet protocol (IP) thread to the user's computer via radio signals rather than wires. To communicate with the wireless router, individual computers house transceivers such as an internal expansion card, a peripheral docked by USB or, in the case of laptops, a PC card or hard-wired internal device. For those accessing the Internet through a high-speed connection, a wireless router can also serve as a hardware firewall (as opposed to a software program), enabling protection from undesirable outside computers without exhausting as many system resources as traditional firewall programs.

Installing a Wireless Router

First, turn off the PC and modem, then remove the Ethernet cable from the PC and plug it into the router's WAN port. Install a second Ethernet cable between the PC's Ethernet port and one of the router's Ethernet ports. Power the modem, router and then PC, waiting for the system to boot and initialize before attempting an Internet connection. Most routers are programmed with the manufacturer's default settings, including the network's name or service set identifier (SSID), channel and sign-on password. These default settings generally may be changed using included software or an online setup utility provided by the router's manufacturer. Configure the router by entering the router configuration IP address at the URL provided, followed by the configuration utility ID and the default password. To find your router's default IP address and the default login info, refer to the owner's manual. If you own a Linksys router, a popular brand, the IP address is u

Connecting Two Wireless Routers

Bridging two wireless routers involves configuring both networks manually. Visit each network location - which should be recognized by your computer automatically - and configure the appropriate Service Set Identifier (SSID) , Wireless Encryption Protocol (WEP) or WiFi Protected Access (WPA) key and authentication information. Make sure you know the SSID and WEP or WPA key ahead of time.

All CDMA Codes

Samsung sph-n240, n400, a460, a500, etc Nam Programming: Nam Set: ##Spc Test Mode: 47*869#1235 Debug Menu: ##33284,ok Service Menu: Menu+8+0 (#889) Reset (Life time, Clear Memory, etc): ##786,ok A-key: ##2539,ok Label Selection: ##3882,ok Label(Home, Work, etc) : **523,ok NGG Setting (Gateway, etc.): ##2769737,ok Vocoder: ##8626337,ok CAI Change: ##7738,ok Enable TTY: ##889,ok Samsung sch-411, 611, n105, a100, a300, a2000, etc Nam Programming: Nam Set: 47*869#08#9 Nam Set: Menu+60 Test Mode: *759#813580 Test Mode: 5809540*45680 A-key: Menu+0, 25## External Audio: Menu+0, #### Debug Menu: Menu+8, 0415 or Spc Debug Menu: Menu+9, 0415 or Spc Brief NAM Programing: Menu+40,626 (not all version) LCD Contrast: Menu+45 (not all version) SIO Mode: Menu+49 SIO Mode: Menu+69 Samsung a300, a530, a610, a620, a660, a670, etc Nam Programming: Nam Set: Menu, 6, * Service Menu: Menu, 9, * Test Mode: 47*68#13580 Samsung X, E, V, S-series (kore

Make Faster Your Nokia Mobile Phone.

May you have noticed your nokia mobile phone become slow with passing of time .there are many causes of this problem .there is trick for you to make nokia mobile phone faster .it is so easy to apply you cand do it yourself .If  you follow these tips you will notice that the speed of your mobile phone is increased Follow all these steps and it’ll make your Nokia 6630 run faster than before! 1. Always use the default nokia theme. To do this go to Tools > Themes ; then select Nokia and press the options button and select apply. 2. The log takes too much of ram. To reduce the amount of ram used by log, open the menu and select Log. Press the options button and select settings. Change the log duration from 30 days to 1 day (or No log if you don’t need the call and sms logs). Then goto the recent calls list and one by one open the Missed calls list and clear it by going to options > clear list. Then the Received calls list and clear it and finally the dialled nos list and clear

How to restore the windows XP to a previous working state?

Image
Today tip is very useful to recover the windows XP problems and then restore it in previous working state. You can   recover the windows critical components and return your computer to earlier state without loss of personal data u sing windows XP built-in system restore feature . With new programs being installed, viruses infecting and spyware creates problem in your browsers it is not unusual for your computer to suddenly stop behaving correctly. So you can perform the windows recovery process and return your computer to earlier state within a minute .   Follow the given steps to run System Restore wizard : To use this feature, you will need to be logged into your computer with administrative rights. First click on Start button> All programs> Accessories> System Tools then click on System Restore. On right side of the page, click on "Restore my computer to an earlier time" check box under "To begin, select the task that you want to perform" area and